Anaconda installation on Windows 10/11
 Image credit: Panos Sakalakis on Unsplash
Table of Contents
Motivation
Whether working, or studying, everybody uses various sorts and types of software on their computer. Around 34 courses at Wageningen University & Research use Anaconda Python as software in their course, e.g., SSB30806 Modelling in Systems Biology, and SSB32806 Introduction to Systems and Synthetic Biology.
Two ways to install Anaconda are offered here:
- WUR AppStore. This is the RECOMMENDED way!
- Manual installation for those who, for whatever reason, do not want to use the WUR AppStore.
1. WUR AppStore
The WUR AppStore is the place where you will be able to download, link to, or virtually access the software you need for your study programme and courses. Not only during the computer labs and courses, but also for self-study after those.
For more information see: What is the WUR AppStore
Windows 10/11 compatibility and WUR AppStore installation
- To safely use the study and course software, you need to connect your laptop to the WUR network with your WUR account. Windows 10 or 11 Education Edition or Professional Edition is needed on your laptop to be able to access the WUR AppStore. If you are using a Home Edition of Windows 10 or 11, you will be automatically upgraded to the Education Edition.
- If you have Windows 10 or 11, you can proceed to the manual: How to connect to the WUR AppStore.
Using the WUR AppStore
The use of the WUR AppStore is very well described by the WUR TEAM Study Anytime, Anyplace. The first article can be found here: How can I use the WUR AppStore
The WUR AppStore currently contains Anaconda3 2025.06-0.
Support WUR AppStore
In case you need support installing or using the WUR AppStore you can contact the WUR Servicedesk IT either by telephone: +31 (0)317 488888 / mail: Servicedesk.IT AT wur.nl. You can also visit the Servicepoint IT, ground floor left of the Grand Café, in Forum (Building 102) on the WUR Campus.
2. Manual Installation
By default the Anaconda installer wants to install into the C:\ProgramData folder of your Windows Operating System. According to Microsoft this folder is “used by applications to store data for standard users, because it does not require elevated permissions”. However, it is not recommended to use for installing software. The reason, the Anaconda installer chooses this folder, is that it does not contain a whitespace character like in C:\Program Files\. The Anaconda software can not deal with whitespace characters in path names, while running.
To prepare the Anaconda installation a folder needs to be created prior to the installation of Anaconda. Either create the folder C:\MyPrograms yourself in File Explorer, or perform the following steps exactly as described:
- Search for the Command Prompt App by typing
cmdin the search field of the Windows task bar. Press return (Enter) to start the application. A window will appear similar to as displayed in Figure 1 showing your own system username.

- Create the directory
C:\MyPrograms. This is done by copying (CTRL+C) the following line, pasting (CTRL+V) it behind the prompt and pressing return (Enter) to execute. In case the directory already exists, the messageA subdirectory or file C:\MyPrograms already exists.will appear.
mkdir C:\MyPrograms
- The Command Prompt application can now be closed by typing
exitand executing it by pressing return (Enter).
Download
At the time this post was written, the latest release of Anaconda3 was version 2022.10. It has been updated to the latest release version 2025.06-1 of Anaconda3.
The installer for Windows 10/11 can be downloaded directly from this link: Anaconda3 2025.06-1 for Windows (ca. 914.6 MB, 64-bit).
Installation
For newer versions of Anaconda3 than 2022.10 the steps described below are the same and still correct, but start with a newer version of the downloaded executable installer file of Anaconda3. The screenshots in this post have not been updated. Therefore, what you see during your installation will differ with respect to the version number shown in the screenshots.
- Right-click the downloaded file Anaconda3-2025.06-1-Windows-x86_64.exe and select ‘Run as administrator’, as shown in Figure 2. This file will most likely reside in your Downloads folder of your user account.

- Windows will ask for permission to allow the application to make changes to your device as shown in Figure 3. Click ‘Yes’ to continue.

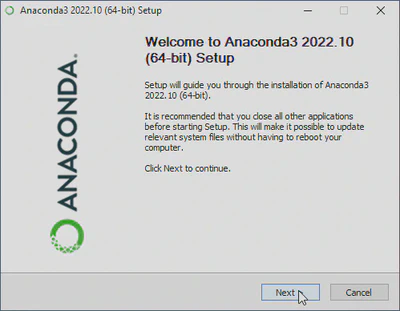
- After the installer has started, a first selection window will appear as displayed below in Figure 4. Click the ‘Next >’ button to proceed.
- The installer will now display the license agreement for installation of Anaconda3, as shown below in Figure 5. Click on the ‘I Agree’ button to agree to the terms.

- After agreeing to the license terms, the Anaconda3 setup will ask for whom you wish to install for, as displayed in Figure 6. Select the radio button ‘All Users (requires admin priveleges)’ and click on the ‘Next >’ button to proceed.

- Having selected the installation type, the Anaconda3 setup will request for an installation location as shown in Figure 7. Change the destination location to
C:\MyPrograms\Anaconda3, to match Figure 7, by typing the destination path directly into the text field displayed (currently showingC:\ProgramData\Anaconda3). Click on the ‘Next >’ button to continue.

- After selecting the installation location folder the Advanced Installation Options will appear, as displayed below in Figure 8. Leave the selection as displayed and click on the ‘Install’ button to start the installation.

- Once the installation has been completed Figure 9 will be displayed. Click on the ‘Next >’ button to continue.

- Next the Anaconda3 Setup will show some information on how great Anaconda works with DataSpell, as shown in Figure 10. Click the ‘Next >’ button to proceed.

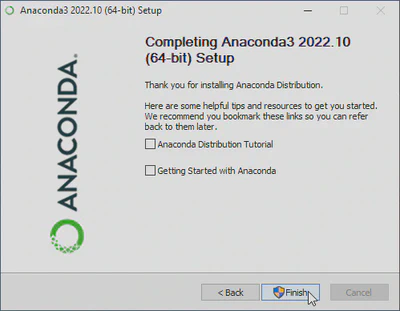
- Finally the Annaconda 3 Setup shows that installation has been completed as displayed in Figure 11. Remove the tick marks from the boxes in front of ‘Anaconda Distribution Tutorial’ and ‘Getting Started with Anaconda’, unless you want to display this information, click the ‘Finish’ button to finish off the installation and close the Anaconda3 Setup.
Below in Configuration Anaconda3 you find information about additional tasks you may need to perform.
Use the ones required!
Configuration Anaconda3
Upgrading Anaconda Navigator (Anaconda3)
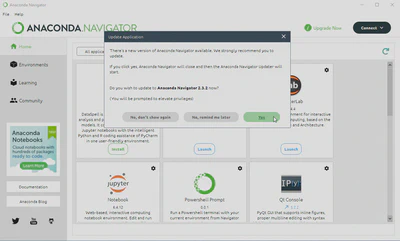
When starting Anaconda Navigator from your Start Menu the Navigator may open displaying the message shown in Figure 12.
To upgrade Anaconda Navigator follow these steps:
-
Click on ‘Yes’ as shown in Figure 12.
-
Windows will ask for permission to allow the application to make changes to your device as shown in Figure 13. Click ‘Yes’ to continue.

- Continue the procedure as indicated on your display to perform the update of Anaconda Navigator.
Add a R kernel
After installing Anaconda3 only the Python kernel is present. To add a R kernel for use inside Jupyter Notebook or JupyterLab perform the following steps:
-
Open the Start Menu and navigate to ‘Anaconda3 (64-bit)’.
-
Start ‘Anaconda Powershell Prompt (Anaconda3)’. A window will open displaying the prompt as
(base) PS C:\>. -
Navigate to where
R.exeis located. Let’s assume you have R v4.2.1 installed, either via the WUR AppStore or via R installation on Windows 10/11. For other R versions than 4.2.1 do not forget to change the R version number!-
Use the following commands:
 cd C:\Program Files\R\R-4.2.1\bin\
 .\R.exe
 ## At the R prompt, indicated by >
 install.packages("IRkernel")
 IRkernel::installspec()
 q()
 # Question in R: Save workspace image? [y/n/c]: n
 ## back at the powershell prompt, indicated by (base) PS C:\>
 exit
-
Now the R kernel will be available in Jupyter Notebook and JupyterLab.
Add a Julia kernel
After installing Anaconda3 only the Python kernel is present, unless you already did Add a R kernel . To add a Julia kernel for use inside Jupyter Notebook or JupyterLab perform the following steps:
- Open Julia on your WURclient. A window will open and you will see the prompt displayed as
julia> - Type
]and the prompt will change into(@v1.8) pkg>. This under the assumption that you have Julia v1.8.2 or later installed. For other versions of Julia the version number for package management will differ. - Type the command
add IJulia. This will install a lot of packages and make the Julia kernel available in Jupyter Notebook and JupyterLab. - Close the Julia package manager by pressing the BACKSPACE key on your keyboard.
- Type
exit()to close Julia.
Now the Julia kernel will be available in Jupyter Notebook and JupyterLab.
Maikel Verouden, Ph.D.
Researcher | Lecturer | IT & Organization contact person
My research interests include Statistics, Teaching and programmable matter (statistical software).