RStudio installation on macOS
 Image credit: Maxim Hopman on Unsplash
Table of Contents
Motivation
Whether working, or studying everybody uses various sorts and types of software on their computer. Students taking Statistical Courses, as taught by the Mathematical and Statistical Methods group at Wageningen University & Research, will most likely use R.
Some of these courses (e.g., MAT20306 Advanced Statistics, MAT27803 R for Statistics, and MAT32806 Statistics for Data Scientists) mainly use RStudio. Also other courses (e.g., HNH45306, and BIF21306) taught at Wageningen University & Research use R through RStudio as well. Therefore, students will need to be able to install RStudio.
In the text some symbol combinations are used for shortcuts, the following table explains the meaning of these symbols in relation to specific keys on your keyboard. To use the shortcuts press the keyboard keys simultaneously, e.g. ⇧⌘A means ⇧+⌘+A.
| Icon | Keyboard Meaning | Icon | Keyboard Meaning | |||
|---|---|---|---|---|---|---|
| ⌘ | command | ⇪ | caps lock | |||
| ⌥ | option (or alt) | ↩ | carriage return (return/enter) | |||
| ⌃ | control | ⌫ | delete/backspace | |||
| fn | function | ⌦ | forward delete (fn + ⌫) | |||
| ⇧ | shift (either left or right) | ⎋ | escape |
Download
At the time this post was written the latest stable release of RStudio was version 1.2.5033. It has been updated to the current stable release 2025.09.2 Build 418 (nicknamed “Cucumberleaf Sunflower”), which will work on macOS Ventura (version 13.x) or later.
Download RStudio using the following link: RStudio 2025.09.2 Build 418 (ca. 656.36 MB)
If you are on a 32 bit system, you can use an older version of RStudio.
RStudio Installation
The screenshots in the installation steps described below have not been updated. However, the procedure is correct even for newer versions of RStudio. Just bear in mind, that what you see during your installation may differ from the screenshots shown.
Prior requirement for the RStudio installation on macOS:
To be able to install RStudio you will need to have R installed and configured first. If you haven’t done so already, please read the (re-)install and configure R on macOS (use the link above to go to that specific post) before continuing with this post.
To install RStudio on macOS perform the following steps:
- Open the downloaded RStudio disk image. This file will most likely reside in Finder > Downloads (shortcut: ⌥⌘L). The file can more easily be found by switching into List view (shortcut: ⌘2). To switch to Icon view use the shortcut: ⌘1. The Rstudio disk image will look like the image displayed below in Figure 1 (version number will differ and reflect the current version).
- Opening the RStudio disk image will cause a window labeled ‘RStudio-xxxx.xx.x-xxx’ to appear (xxxx.xx.x-xxx represents the version number used), containing the RStudio application (see Figure 2).
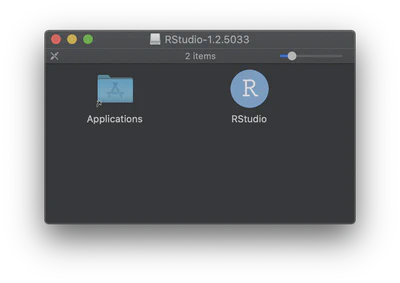
- Drag the RStudio application and drop it on the Applications folder shown in the same window.
- Close the ‘RStudio-xxxx.xx.x-xxx’ window by clicking on the red ball in the top left corner of the window.
- The opened disk image is still mounted as a volume on your desktop and will look like the image shown below in Figure 3. Click this icon on your desktop once to select it and press ⌘E (shortcut for eject) to close it. Now you can discard the downloaded
RStudio-xxxx.xx.x-xxx.dmgfile from Finder > Downloads (shortcut: ⌥⌘L) by clicking it once to select and using the shortcut ⌦ (press: fn + ⌫) to put it in the trashbin. To completely remove the installer disk image remove it from your trashbin.

Resetting RStudio desktop’s state
RStudio Desktop stores its internal state in a hidden directory. If this directory does not exist, RStudio will create it on start up. This directory includes information about open documents, log files, and other state information. Removing (or renaming) this directory will reset RStudio’s state.
It is recommended to rename this directory to create a backup version instead of completely deleting it. This allows saving your settings, in case needed to revert back to them. Additionally, if experiencing a crash or RStudio failed to start, this directory may contain vital information for determining the source of the error.
Starting with RStudio 1.3, user preferences are stored in a separate folder from internal state. This allows for performing a state reset without losing settings, and also allows for preferences to be sync’ed between machines (in e.g., AppData\Roaming on Windows) while internal state is machine specific.
Some versions of RStudio Desktop store additional preferences (such as the size and location of the window and the rendering mode) in a separate location. To fully reset state, this must also be deleted or renamed, as described below in “Resetting Other Preferences”.
When using RStudio Projects, it is also recommended to reset the project-specific state if experiencing issues - this can done by navigating to the Project’s folder in the file browser, and renaming the .Rproj.user directory there.
Accessing the RStudio-Desktop Directory (Internal State)
A backup can easily created by running the following command from the terminal:
mv ~/.local/share/rstudio ~/.local/share/rstudio-backup
Alternatively, open a Finder window into the rstudio directory by typing the following command at the Terminal:
open ~/.local/share/rstudio
In RStudio 1.3 and prior, the folder ~/.rstudio-desktop is used instead of ~/.local/share/rstudio.
Resetting other preferences
To create a backup, run the following command from the terminal:
defaults read com.rstudio.desktop > ~/backup-rstudio-prefs
To delete these settings, run the following command from the terminal:
defaults delete com.rstudio.desktop
com.rstudio.desktop could create serious problems with your system.
Maikel Verouden, Ph.D.
Researcher | Lecturer | IT & Organization contact person
My research interests include Statistics, Teaching and programmable matter (statistical software).